When rotation is limited it indicates dysfunction in the deep structures of the shoulder — the glenohumeral ligaments, joint capsule, and the rotator cuff muscles.
And this is a big problem.
Because problems here affect the normal motion of the joint itself. Which leads to compensatory movement and motor patterns and abnormal stress distrubution in and around the shoulder.
These patterns can only continue for so long before then progress to a repetitive strain injury.
So when your exam reveals restricted motion with internal or external rotation don’t get sidetracked with trying to retrain scapular scapular stability or strengthen the rotator cuff. (It doesn’t make sense to try to strengthen a motion that the patient or client doesn’t have).
Focus first on rotational mobility and control.
Developing Shoulder Internal Rotation Mobility
Of course, manual therapy techniques like Active Release (ART) and Functional Range Release (FR) are invaluable here. But these alone won’t be enough.
Home exercise prescription is also critical. Because we need to create a consistent (i.e., daily) stimulus to promote change in the shoulder capsule and rotator cuff muscles.
So in this article I will review a Shoulder Internal Rotation PAILs-RAILs exercise that I use. This is the exercise I use as soon as I see a shoulder IR deficit.
[FYI, to see how to target shoulder external rotation click here….]
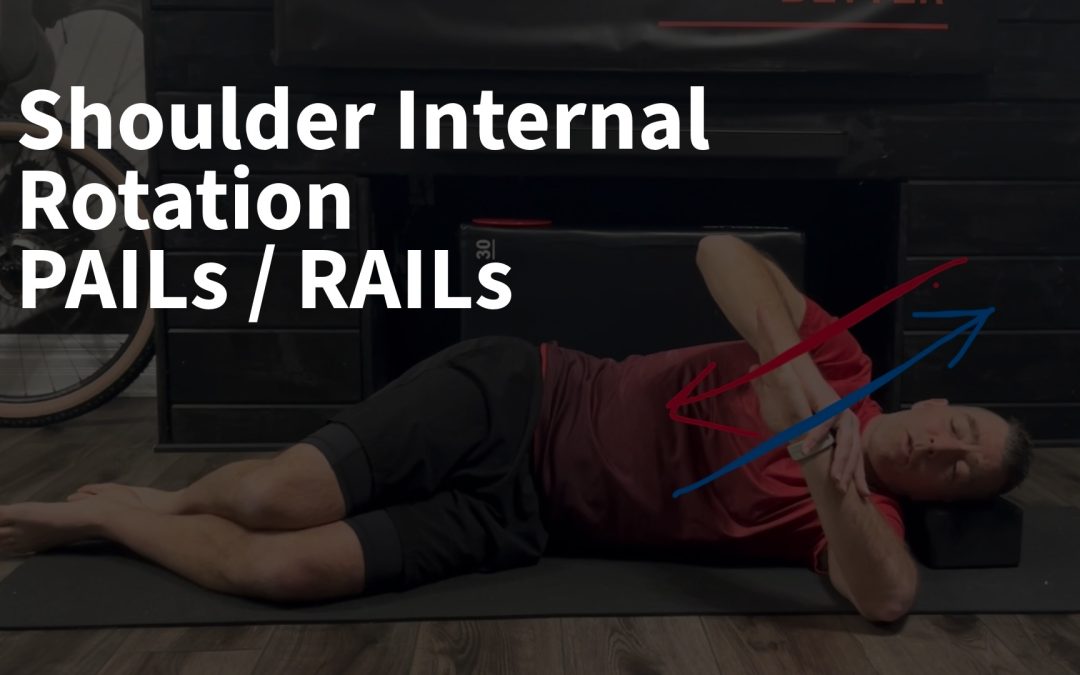
Side Lying GHIR PAILs/RAILs Stretch
If your not familiar with these exercises, PAILs (Progressive Angular Isometric Loading) and RAILs (Regressive Angular Isometric Loading) are mobility exercises that utilize isometric contractions performed at limited joint ranges. These active muscular contractions improve flexibility faster than static stretching by engaging the nervous system to relax tight muscles on the opening/progressive side of the joint.
But that’s not all. Utilizing these isometric contractions on the closing/regressive side can help to develop strength and control of muscles responsible for creating this joint position and ensuring the joint is protected and stabilized.
To perform the exercise…..
Step 1:
Begin on the floor in side-lying, with the upper arm positioned at shoulder height and resting on the floor. The forearm is pointing towards the ceiling.
From here the body rotates towards your arm. This will pin the back of the shoulder and shoulder blade into the floor. (We don’t want the shoulder blade to move during the stretch).
Step 2:
Now rotate the wrist/forearm down towards the floor as far as possible (shoulder internal rotation).
The opposite arm can be used to gently press the arm down to deepen the stretch. Hold this initial stretch for 8-10 seconds.
Step 3:
From this position we will add our isometric contractions.
Rotate the forearm back into external rotation (blue arrow), but resist this motion with your opposite hand (red arrow). (The muscles around the shoulder will contract but the arm will not move).
If there is no pain a firm contraction can be used. If there is discomfort the contraction will need to begin more gently until strength/tolerance improves.
Hold this contraction for 8-10 seconds.
Step 4:
The opposite hand is now moved to the front of your wrist. The forearm is rotated forward into internal rotation (blue arrow), but the motion is resisted with the hand (red arrow). (The muscles around the shoulder will contract but the arm will not move).
Hold this contraction for 8-10 seconds.
Step 5:
Now relax the muscles and bring the wrist/forearm farther forward to deepen the stretch.
Hold for 8-10 seconds.
Repeat this contract-contract-stretch cycle for 3-4 repetitions.
Programming
Typical programming would be to perform 3-5 cycles. Initiall it is very effective to combine this exercise with a targeted shoulder mobility sequence done on a daily basis.
As the patient/client progresses you can progress the exercise by increasing the intensity of the isometric contractions. As intensity increases I will typically m odify to 2-3x/week to allow the shoulder to recover.