
Therapeutic interventions aimed at improving trunk stability have become one of the most important staples in the treatment of lower back pain.
But traditional exercises like curl-ups, planks, or bridges are not enough. We must also teach our patients more functional trunk stability exercises that more closely mimic how their muscles need to stabilize their spines during real life activities.
And we need easy and effective protocols to start developing this stability as early as possible in the treatment plan. That is exactly what we are going to discuss in this article.
Understanding Trunk Stability
Simply stated, stability is a joint’s capacity to maintain proper alignment under load and/or during movement. It is a joint’s ability to resist internal and external forces.
And when do we need this stability? Anytime we move.
But here’s the problem…
Traditional trunk stability exercises like curl-ups, planks, and bridges will help build muscle capacity, but not necessarily control. Just because a muscles is stronger does not mean the body will use it when it should.
This would be akin to thinking a hamstring stretch will fix the patient who gets lower back pain when bending forward. Improving hamstring mobility may be part of the solution. But it won’t be enough. You also need to retrain the faulty forward bending movement pattern.
So the first thing we need to do is teach the patient how to perform a stabilizing contraction of their abdominal muscles. Then we need to show them how to use this stabilizing contraction with daily activities.
Let’s take a look at exactly how to do this.
Creating the Foundation with the Abdominal Brace
The easiest and most effective way to activate the trunk muscles is to perform an isometric contraction of the abdominal muscles. McGill refers to this as an abdominal brace (1). This brace will co-activate the transverse abdominis with the internal and external obliques to increase stiffness and stability throughout the lumbar spine (2).
The abdominal brace is the starting point for teaching trunk stability. Each of the more advanced progressions will hinge on the patients ability to perform this brace. So you need to make sure your patient gets this right.
It should be noted that it is common for back pain patients to be unable to hold an abdominal brace with respiration. The contraction is often lost as they inhale. This is a problem. Abdominal control needs to be independent of respiration. Otherwise the spine will become unstable and more susceptible to injury with every breath.
Here’s how to perform an abdominal brace:
- Begin on your back in a relaxed neutral spine position
- Gently contract your abdominal muscles. It is often helpful to imagine you are about to be hit in the stomach and you need to tense your abdominal muscles for protection
- Now try to hold the abdominal contraction as you breathe in and out
- Note: It can be helpful in the initial stages to lightly squeeze or press into you abdominal muscles with your hands to feel the muscle contraction. The contraction / stiffness of the abdominal muscles should remain steady with each breath
- Repeat this process for a few minutes several times per day
This sequence should also be repeated in other positions such as sitting, quadruped, and especially standing.
The Standing Trunk Stability Progression
As soon as the patient is able to properly maintain an abdominal brace they can be progressed to the Standing Trunk Stability Progression.
As previously discussed, we need to make trunk stability exercises functional. This is done by adding various pushing and pulling motions against resistance while the patient maintains an abdominal brace.
As we push or pull, the tension created in the resistnce band or cable acts to pull the spine out of alignment. The goal is to counter this tension through the abdominal brace. The active abdominal contraction holds the spine in the proper alignment against the imposed load.
I love these exercises because they are simple and can be easily progressed as the patient’s strength and control improves. And in addition to doing these as a formal exercise set, the patient can be easily taught how to integrate these movements into daily activities.
For example, every time the patient opens a door, pulls a bag or lifts a child out of a car, or pushes a vacuum they they can engage their abdominal brace to add extra support and protection to the spine. Just like they are doing with their exercises.
Note: For any My Rehab Connection subscribers you can find the Standing Trunk Stability Progression tract in the pre-loaded exercise groups section. And don’t forget you can add the entire exercise with the “ad entire group” feature and then pause any progressions the patient is not quite ready for.
Here are the progressions…
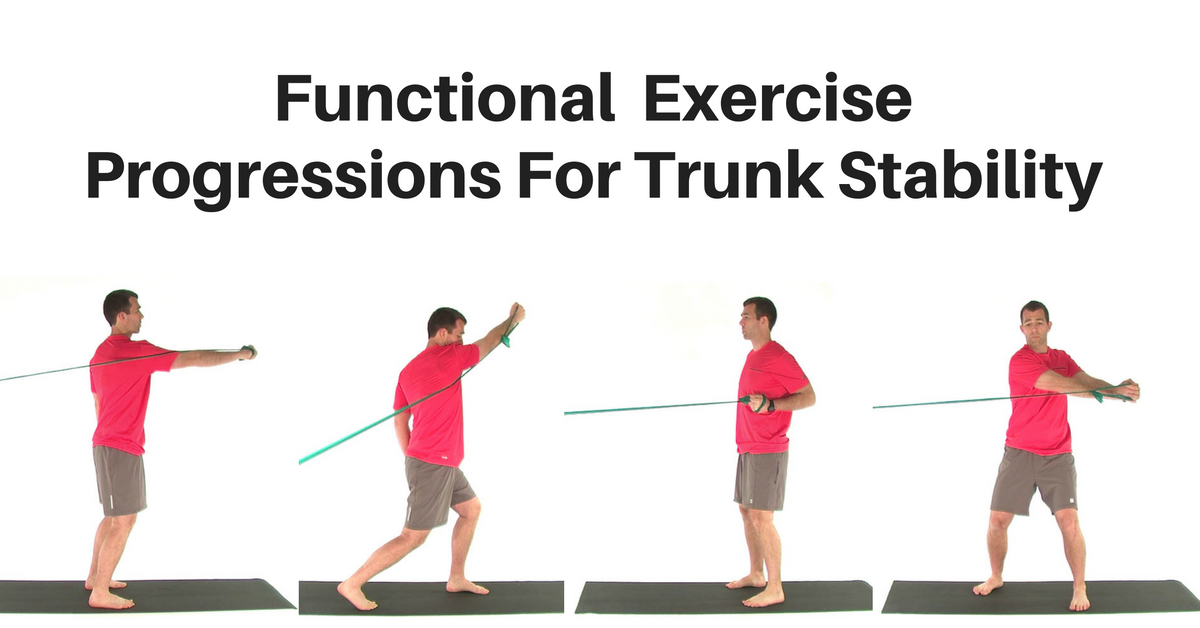
Standing Single Arm Pull
- Begin in a standing position holding a resistance band in one hand. The other end can be secured in a door in front of you
- With the spine in a neutral posture perform an abdominal brace
- Now pull the band towards your body
- Remember, the goal is to hold the abdominal muscles contracted to prevent any twisting of the lower back
- Don’t forget to breathe
- You can manipulate the exercise by incorporating a lunge stance or increasing the tension in the band
Standing Single Arm Push
- Begin in a standing position holding a resistance band in one hand. The other end can be secured in a door behind you
- With the spine in a neutral posture perform an abdominal brace
- Now push the band forwards away from your body in a punching motion
- You can manipulate the exercise by incorporating a lunge stance or increasing the tension in the band
Seatbelt
While this is a traditional shoulder exercise it also makes a great trunk exercise. It is a progression from the basic Standing Pull exercise as it creates more of a rotational load on the spine and requires the arm to pull across the body.
- Begin in a standing athletic position holding a resistance band in one hand. The other end of the band should be secured towards the top of a door in front of and across your body.
- With the spine in a neutral posture perform an abdominal brace
- Now pull the band diagonally down and back behind your body.
Bowler’s Throw
This is similar to the Seatbelt exercise but uses a forward flexion motion that will put more demand on the anterior chain.
- Begin in a lunge position holding a resistance band in one hand. The other end of the band should be secured in the bottom of a door behind you
- With the spine in a neutral posture perform an abdominal brace
- Now pull the band diagonally up and across your body.
- Focus on feeling the contraction in the abdominal muscles and focus keeping a strong and stable lower body
Woodchop
The woodchop is a more advanced exercise. While the previous exercises train the muscles to hold the trunk stable against rotational forces, the woodchop begins to create rotational strength.
Just be sure the patient maintains their abdominal brace. And remember this is more about strength and control, not range. Move slow and be sure the movement is driven by the core with a strong base of support from the lower body.
- Begin in a standing athletic stance while holding a resistance band in both hands out in front of you. The other end of the band should be secured in a door to your side.
- Brace your abdominal muscles
- Now rotate your shoulders and upper back.
References
- McGill, S. Low Back Disorders: Evidence Based Prevention and Rehabilitation. 2002. Human Kinetics Publishers.
- Juker, D. et al. Quantitative intramuscular myoelectric activity of lumbar portions of psoas and the abdominal wall during a wide variety of tasks. Medicine and Science in Sports and Exercise, 30 (2): 301-310.