
Tight pec muscles will cause a protracted scapular position, upper thoracic dysfunction, and makes normal shoulder mechanics impossible. That’s why pec mobility is a basic requirement for safe and effective movement.
And with the preponderance of sitting occupations and nearly constant computer and mobile device use (let’s face it, we live slouched with our arms adducted) we as clinicians have to deal with this on a regular basis.
So what is the best way to improve pec mobility?
Certainly there are many effective manual therapy techniques to apply. But your patient is only in your office a few days a week at most. To make effective and lasting change you need to give them something to do at home to support your in office care.
But with so many options how do you know which stretch or exercise is best for your patient?
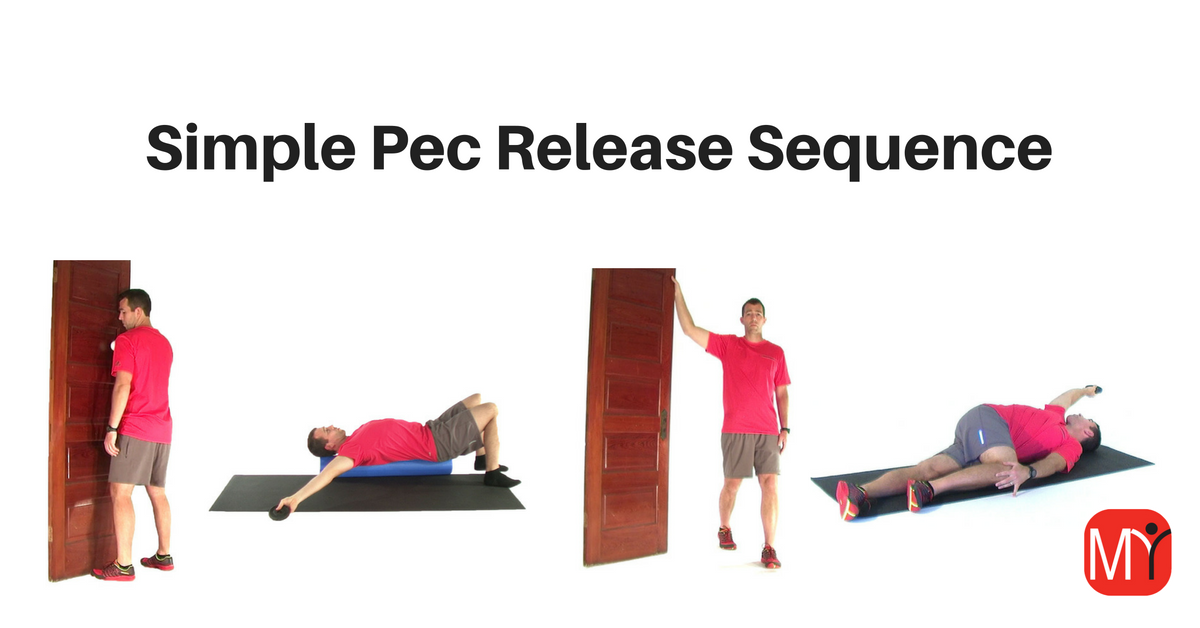
Pec Mobility Sequence
The first thing to realize is there is no one best stretch or exercise, or even type of stretch or exercise. That goes for the pec or for any other muscle or joint.
Different stretches and exercises will target different things. In most cases you need to include several different exercises to target the different elements that are making the pec tight and restricted in each patient.
In other words you need to prescribe a mobility sequence. Let me show you my go-to exercise sequence for improving pec mobility.
Standing Pec Lacrosse Ball Release
With my mobility tracts I typically start with some form of self myofascial release exercise. Remember tight muscles are not just tight but often contain soft tissue restrictions. They become scarred or stuck to adjacent tissues. When this is the case the tissue needs to be released, not just stretched.
Self myofascial release exercises help to break up some of these restrictions and increases blood flow which helps to prime the muscles for the next exercises in the sequence. Interestingly, several studies have shown that doing these types of exercises before traditional stretching leads to bigger flexibility gains than just stretching alone (1,2).
There are a few different home myofascial release options but I almost always prescribe the Standing Pec Lacrosse Ball Release. Here’s how you do it.
- Place a lacrosse ball against a wall and lean your chest into the ball
- Now move your body up and down and side to side to work the ball along your pec muscle
- Go slow and look for any spots that are tender or restricted
- When you find these spots sink into the ball a little more
- While maintaining the pressure you can also move your arm around to help release the tissue
- Do this for a minute or two then move onto the next exercise
Active Isolate Pec Stretch on Roller
I usually like to follow the self-myofascial release with an Active Isolated Stretch. Active Isolated Stretching (AIS) utilizes the contraction of opposing muscles groups in combination with passive assistance to achieve greater ROM and a deeper stretch.
I really like this for building pec mobility. In addition to providing a good stretch for the pec itself it also stimulates the scapular adductors. This helps promote muscle balance and control around the shoulder girdle and upper thoracic spine.
Retracting the scapula during the stretch also teaches the patient how to drive arm motions with the scapula. And as they learn this motion with the exercise they can also be shown how to incorporate it into daily tasks. Like anytime they have to reach the arm back behind their body.
I like to have the patient do this on a foam roller because it creates some space to allow the arm to drop down behind their body. If the pec is really tight this can simply be done laying flat on the floor. Laying on the side of the bed or on a stability ball will work too.
Here’s how to do the exercise.
- Begin lying lengthwise on a foam roller while holding a small weight in one hand (be sure your head is supported).
- Brace your abdominal muscles to stabilize your spine then raise your arm up towards the ceiling.
- Reach your arm down towards the floor. As you do this pull your shoulder blade towards your spine until you feel a stretch on the front of your chest.
- Hold the stretch for 1-2 seconds then raise your arm back towards the ceiling.
- Perform 10-15 repetitions
Standing Pec Stretch
With a really tight pec sometimes you just need a really deep stretch. The Standing Pec Stretch is probably the easiest and most effective for this. This stretch is much more effective after self myofascial release and the AIS stretch.
Here’s how you do it.
- Begin standing in a lunge position with your arm extended and your hand resting on a wall or door frame. It is generally best to have the hand positioned above the height of your shoulder but you can try the arm at different angles to get the best stretch
- Slide your body forward and rotate your upper body away from the wall. Be sure to pull your shoulder blade back towards your spine as you do this
- You should feel a stretch on the front of your chest and shoulder
- Hold the stretch for a few seconds then return to the starting position
- Perform 10 repetitions
- Some people will find it helpful to hold the last rep for 10-15 seconds for a deeper release
The Open Book Reach
The last stretch in the sequence is the Open Book Reach. This is another example of an AIS style stretch, but instead of simply isolating the pec it also hits the external obliques and integrates thoracic rotation. So there is a lot going on here.
But because this is a little more complex I rarely include it in the initial pec mobility sequence. I add it later as initial pec mobility increases. But for those patients who can do this properly it can really make a difference.
And as pec mobility improves and the goal progresses to simply maintaining pec mobility this is often the only stretch that is needed.
As a side note for any My Rehab Connection subscribers, I will still subscribe the patient the entire tract with the “Assign Entire Group” function. But then I pause the Open Book Stretch until the patient is ready for it.
Here’s how you do it.
- Begin on your side while holding a light weight in your top hand. Your upper leg should be bent with your knee resting on the floor.
- Reach your arm back in a upwards/diagonal direction.
- As you reach back pull your shoulder blade back towards your spine and turn your head to follow your hand with your eyes.
- Keep your knee resting against the floor. This will focus the motion at your upper back and shoulder.
- Your should feel a stretch on the front of your shoulder and upper back.
- Hold the stretch for just 1-2 seconds then return to the starting position.
- Perform 10-15 repetitions.
References
- Mohr, A.R. et al. Effect of Foam Rolling and Static Stretching on Passive Hip-Flexion Range of Motion. Journal of Sport Rehabilitation. 2014, 23, 296-299.
- Škarabot, J. Comparing the Effects of Self Myofascial Release with Static Stretching on Ankle Range of Motion in Adolescent Athletes. The International Journal of Sports Physical Therapy, 2015, 10 (2), 203-212.