
Improving mobility is what we as chiropractors and manual therapists do all all day. While we address tight and restricted muscles with manual therapy techniques, exercises for improving mobility are also an essential component of care.
This concept makes sense, but it’s application is not always straightforward. With thousands of stretches and exercises to choose from which are most effective for our patients?
The Best Exercises For Improving Mobility
The first thing to realize is that there is no one best stretch or exercise. Different types of exercises will target different things. And in most cases you will need to include several different exercises… and you need to combine them in the right order… and you need to tailor them to the specific needs of each patient.
Sound confusing? I’ll show you how to simplify the process in this 5 part series. Here is what we’ll cover…
- The absolute best exercises for improving mobility
- How to organize these exercises for the greatest results
- How to make exercise prescription incredibly easy for both you and your patients
In this initial article I will discuss self-myofascial release techniques. Then over the next few articles we will look at the other major exercise group needed for improving mobility. Finally I’ll tie it all together and discuss how to prescribe the exercises to ensure maximum results and in a way that will save you a ton of time and headaches.
Let’s get started.
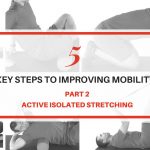
Part 1 – Self-Myofascial Release
Often muscles are not just tight – they are restricted. They become scarred, stuck to adjacent tissues, or contain trigger points. When this is the case tissues often needs to be released, not just stretched.
These restrictions respond well to manual therapy techniques such as Active Release Techniques or Instrument Assisted Soft Tissue Manipulation. But patients can also be shown how to do target these restrictions at home as well.
Here are the simplest ways to do this…
1. Rolling Restricted Tissue on a Ball or Roller
Have your patient lie on a foam roller or small firm ball and roll the restricted tissue back and forth over the device. Simply move back and forth and look for tender spots. I tell my patients if it feels soft and supple move on – that tissue is healthy so focus more on the restricted tissue.
Remember, to be most effective your patients need to relax and allow the tight tissue to sink into the roller or ball. The more body weight the better, but keep it tolerable. If it’s too painful or it feels like it is causing damage back off a bit.
Here’s an example of one of my go-to self myofascial release exercises for overhead mobility issues. It is super simple and effective.
Have your patient lie on their side with the lateral aspect of their scapular and upper arm across a foam roller. Then slide up and down over the roller Go slow and focus on the more tender areas for a better release. They can work along the lateral border of the scapular, into the back of the shoulder, and into the triceps. Usually 1-2 minutes is enough.
Lat / Triceps Release with Foam Roller

This is one of my go-to exercises for overhead mobility issues. It is super simple, and super effective.
Have your patient lie on their side with the lateral aspect of their scapular and upper arm across a foam roller. Then slide up and down over the roller Go slow and focus on the more tender areas for a better release. They can work along the lateral border of the scapular, into the back of the shoulder, and into the triceps. Usually 1-2 minutes is enough.
2. Smash and Floss
I like using the foam roller because is can cover a lot of area quickly. But sometimes a little more focused approach is needed.
So when you find some of those tough areas with the roller you can then target these spots with a small firm ball (a lacrosse ball works well and is cheap). Just like the roller, you can relax the restricted tissue so the ball sinks deep into the tissue for a more focal release.
A tweak on this method is to move the joint while maintaining pressure with the lacrosse ball. Kelly Starrett – author of Becoming A Supple Leopard and other books – refers this to the “Smash and Floss” technique.
Starrett suggests the addition of joint motion combined with the deep focal pressure will help to unglue restricted tissue and restore sliding between adjacent muscles and fascial layers. As a side note this can also be done when using the roller as well.
Remember, If you are a My Rehab Connection subscriber you can find a ton of self myofascial release exercises in the exercise library.
Here is one of my favorite smash and floss exercises deep compartment tendons in the medial calf. With foot and ankle problems theses muscles often get restricted and stuck. This release is a favorite of mine with these issues.
Begin seated on the edge of a chair with one leg crossed over. Roll a lacrosse ball along the medial calf just behind the tibia and search for any tender and tough sports. Apply some deeper pressure along those spots for a better release. Repeat this process for 1-2 minutes.
Medial Calf Release with Lacrosse Ball (Smash and Floss)