The Bridge exercise is a classic staple in back pain treatment and rehabilitation. There is a good reason for this. It is simple, effective, and can be easily modified to meet the needs of virtually any patient.
And it targets one of the most common issues we see with lower back pain… weak and inhibited glutes. This dysfunction can be diagnosed through the observation of reduced muscle mass in the posterior hip, or with a failed Janda Active Hip Extenson Test (the patient will extend the leg with the hamstring and erectors instead of their glute).
So when you see these patterns in your office the Bridge Exercise should start to show up on your radar.
But keep in mind that just prescribing the Bridge is probably not going to help. That’s because when the glute is inhibited other muscles with be overactive to pick up the slack. More often than not this will be the hamstrings, but it can also involve the quads or even the erectors.
This pattern of under-active glute and over-active hamstring will occur with with functional movements like the squat or during gait. And unless we take steps to prevent it, this pattern will also occur with rehab exercise that target the glutes. Including the Bridge exercise!
So yes, the Bridge exercise can be one of the most effective exercises to rehab the glutes. But to be effective the it needs to be executed correctly.
So in this article let’s take a look at an old classic, and discover what the Bridge does, and how to make sure your patients are doing it properly.
The Bridge Exercise – 2 Prerequisites
Like most lumbar stability exercises, with the Bridge we are trying to train the body to move through the hips while maintaining control and alignment of the spine. This requires two things.
First, the patient must be able to position the pelvis and lumbar spine in a proper (i.e, neutral) position. And they need to be able to hold the spine in this position. So the patient needs to be able to properly perform an anterior and posterior pelvic tilt. And the patient needs to be able to perform an abdominal brace.
So just like like most spine stability exercise progressions, pelvic tilts and abdominal bracing are the starting points for the Bridge exercise.
As these skills are learned the patient can then move on to the second requirement, which is developing the ability to generate a proper glute contraction. With this task they need to focus on what it feels like to engage the glutes.
Usually this is simply a matter of having the patient squeeze their glutes to voluntarily activate them. If there is any difficulty with this I usually send them home with these ‘butt squeezes’ as their home exercise. Once they have mastered this (usually they have this down by the next visit) I will move onto the Bridge exercises itself.
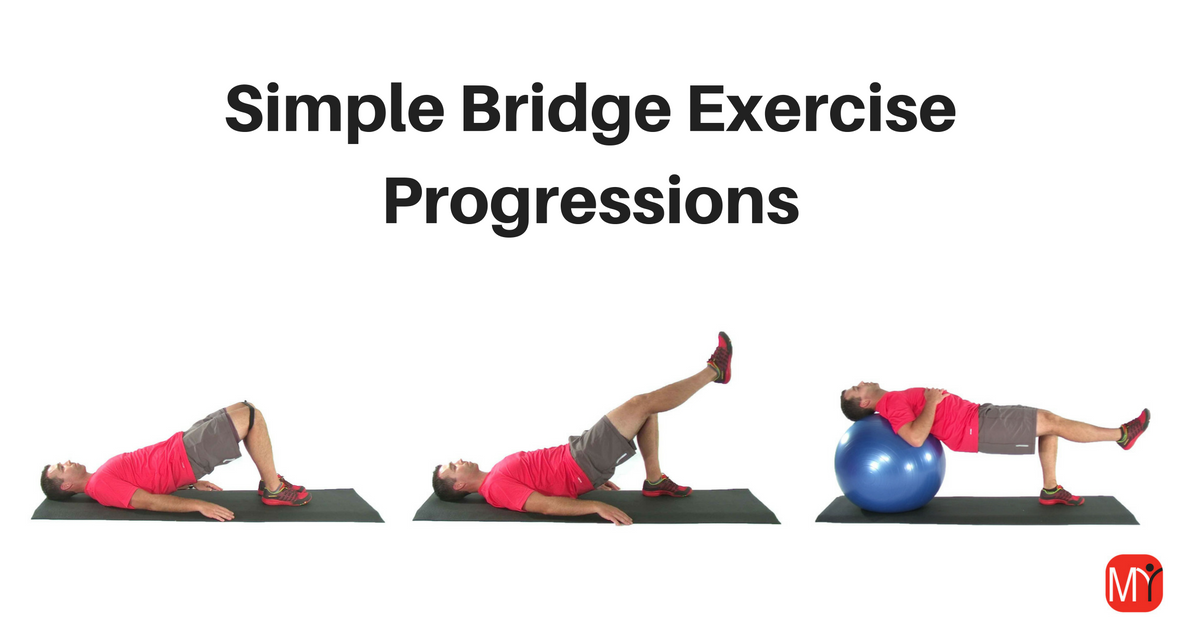
Here are the Bridge exercise progressions that I find most useful. If you are a My Rehab Connection subscriber you can find this progression in the My Exercise Groups section.
Basic Bridge with Band
I almost always prefer to start with a Basic Bridge with a stiff band or strap around the knees. To begin the exercise I will have them perform a light abdominal brace, then press the knees out against the strap. This helps to activate the entire glute group during the exercise. Also, I prefer a stiff strap over a theraband as they can push harder while keeping the knees aligned between the hips and feet. The patient then squeezes their gutes and lifts their hips off the floor.
During this sequence there are two key things to check.
First, does the spine stay in neutral? If the posterior trunk muscles (especially the multifidi) are weak or underactive the spine will flex. It will appear that they are lifting the hips with an exaggerated posterior pelvic tilt.
This is bad. You need to correct this by cueing them to maintain an slight arch/anterior pelvic tilt in their lumbar spine and hold an isometric abdominal brace as they lift. This is why pelvic tilts and bracing need to be mastered first.
Second, you need to make sure the glutes drive the motion. As discussed above, it is not enough that this is a ‘glute’ exercise. And it’s not enough that the patient can activate the glutes at rest. The activation needs to be maintained with movement.
You can check this by palpating the hamstrings for over-activity as they lift off the floor. But it is easier to simply ask the patient which muscles they feel working. When done correctly they should feel the glutes working. Remember, the hamstrings will be contracting but they should play a support role, not the primary role.
If the patient has trouble with this a simple trick is to have then move the feet in closer to the hips. This will shorten the hamstrings and make them harder to activate.
Here are the step-by-step instructions for the Basic Bridge with Band exercise.
- Begin lying on your back with your feet flat on the floor and stiff strap or belt tied around your knees. Your knees should be about 6-8 inches apart so they are in line with your hips and feet.
- Push your knees out against the band or belt. Then squeeze your ‘butt’ muscles and lift your hips off the floor.
- Hold the hips off the floor for 1-2 seconds then slowly return to the starting position.
- Lift the hips into the air again. Repeat this up and down motion for 10-15 repetitions.
- Perform 2-3 sets once per day.
Bridge with Single Leg Static Hold
The Bridge with Single Leg Static Hold is similar to the Basic Bridge exercises, but at the top of the bridge you will lift one foot off the floor. Moving to single leg support creates an additional rotational load. The goal is to hold the hips and pelvis level to resist this load. This helps to build transverse plane stability.
Here’s how to do it.
- Begin lying on your back with your knees bent and feet flat on the floor.
- Squeeze your ‘butt’ muscles and lift your hips off the floor.
- Now lift 1 leg off the floor. Keep your abdominal muscles tight and continue to squeeze your ‘butt’ muscle on your stance leg – do not allow your hips or pelvis to twist towards the floor.
- Hold this position 1-2 seconds then return your foot to the floor.
- Slowly lower your hips to the floor, then repeat on the opposite leg.
- Perform 2-3 sets once per day.
Bridge with Marching
The Bridge with Marching is utilized the same principles as the Bridge with single leg hold. But in this progression you will alternate lifting each leg while staying in the bridged position.
This will increase the demand on the spinal stabilizers from a coordination standpoint (you now need to shift weight between legs while maintaining spinal control). This also further challenges endurance as the muscle need to stabilize the lumbar spine for a longer duration.
Here’s how you do it.
- Begin lying on your back with your knees bent and feet flat on the floor.
- Squeeze your ‘butt’ muscles and lift your hips off the floor.
- Lift and extend 1 leg. Keep your abdominal muscles tight and continue to squeeze your ‘butt’ muscle on your stance leg to hold the back stable.
- Hold this position 1-2 seconds then return your foot to the floor.
- Now lift and extend the opposite leg.
- Hold this position 1-2 seconds then return your foot to the floor.
- Lift and lower each leg 5 times then lower your hips back to the floor.
- Perform 2-3 sets 1x/day.
Single Leg Bridge
The last exercise in the progression is the full Single Leg Bridge. This progression places a much greater demand on the glute as the body is now raised and lowered on a single leg. You must keep the hips and pelvis level as you raise up and down.
Here’s how you do it.
- Begin lying on your back with your knees bent and feet flat on the floor.
- Squeeze your ‘butt’ muscles and lift your hips off the floor.
- Lift and extend 1 leg. Keep your abdominal muscles tight and continue to squeeze your ‘butt’ muscle on your stance leg to hold the back stable.
- Keeping your leg extended slowly lower your hips towards the floor.
- Raise back up to the bridge position.
- Perform 10-15 repetitions then repeat on the opposite leg.
- Perform 2-3 sets per leg 1x/day.
Other Common Bridge Variations
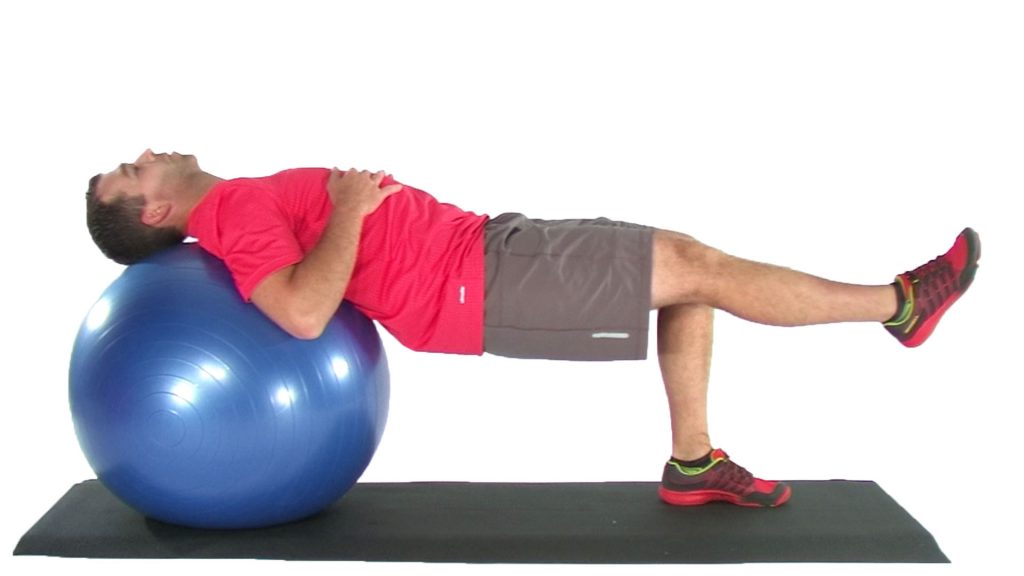
Keep in mind that the exercises I include in my typical progression sequence are only a few of the possible variations of the Bridge exercise. There are countless others. While I usually stick to the exercises described above (my rule is to keep things as simple as possible), one variation I do use at times is to perform the bridge on a stability ball.
For the most part I find the the standard Bridge exercise is better for facilitating and strengthening the glutes. But when general balance and/or controlling lumbar spine posture is a more prominent deficiency adding the stability ball care be a huge help. FYI, each of the progression described done on a stability ball can also be found in the exercise library.