
The hamstrings are a true work horse. They play a critical role in controlling lumbo-pelvic-hip posture with lifting and forward flexed postures. And they’re a major stabilizer of rotational and shear forces at the knee.
Unfortunately it seems like hamstring flexibility gets all the press. But if you want to move safely and efficiently through your hips and lower extremity your hamstrings better be strong too.
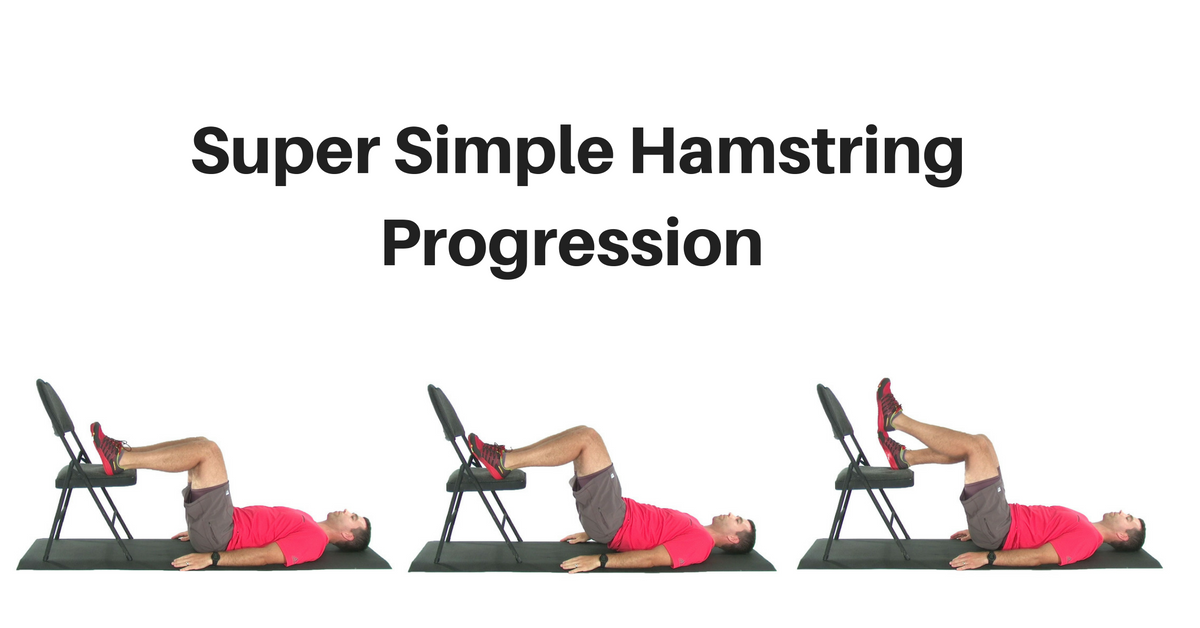
In this article I am going to show you a really simple hamstring exercise tract… the Hamstring Bridge Progression. I like the Hamstring Bridge exercise because it’s both effective and super simple. And it can also be easily progressed into a very challenging hamstring exercise by increasing the contractile demand on the hamstrings… Or by increasing the balance and stability challenge… Or both.
And these progressions allow it to be used for almost any patient. Even those very deconditioned patients who aren’t used to exercise.
For any My Rehab Connection subscribers you can find this tract in the My Exercise Groups section.
Basic Hamstring Bridge
The first exercise in the Hamstring Bridge Exercise Progression is the basic Hamstring Bridge. Here’s how to do it.
- Begin on your back with your hips and knees bent and your heels resting on a bench or chair
- Use your hamstrings to pull your heels into the chair so your hips and back lift a few inches off the floor
- Hold this raised position for 2 seconds then slowly return to the floor
- Perform 2 sets to failure
I like the instruction of performing 2 sets to failure as it makes patients push their effort a little more that just telling them to perform 10-15 reps. Often that will not be enough to stimulate proper adaptation of the muscles.
Keep in mind that failure doesn’t just mean they can’t do anymore. It is also about quality. If form starts to break down or they start to feel muscles other than the hamstrings kick in that also signals a stopping point.
One key thing to look for is an outward rotation of the feet as the body lifts off the floor. This would indicate dominance of the lateral hamstring over the medial hamstring. This is not an uncommon finding with knee conditions.
Performing sets to failure and keeping track of the number also provides an quick and easy assessment of progress. And an indication for when it is time to progress the exercise. After a few weeks they should be able to do more repetitions. When they can bang out about 20 reps they should be ready for the next progression.
Hamstring Bridge – Single Leg with Static Hold
The next progression is the Hamstring Bridge with Single Leg Static Hold. This hamstring exercise will increase the demand on the hamstrings. But because the exercise is now performed unilaterally it also creates a rotational load which helps to develop transverse plane stability at the knee and lumbo-pelvic joints.
Here’s how to do it.
- Begin on your back with your hips and knees bent and your heels resting on a bench or chair
- Lift one foot off the chair
- Now use your hamstring to pull your heel into the chair so your hips and back lift a few inches off the floor
- Hold this raised position for 2 seconds then return the foot to the chair
- Now lower your body back to the floor
- Perform 2 sets to failure
Remember to focus on proper form. As the foot is lifted there cannot be any twisting of the lower back or hips. That is the key. The rotational moment created by the single leg support must be balanced by increased muscle effort to maintain posture and stability around the hip and trunk.
Single Leg Hamstring Bridge (Dynamic)
The last progression in the tract is the full Single Leg Hamstring Bridge. While it looks easy this will actually be quite challenging to most patients.
- Begin on your back with you hips and knees bent and your heels resting on a bench or chair
- Raise one foot off the chair
- Use your hamstrings to pull your heel into the chair so your hips and back lift a few inches off the floor
- Hold this raised position for 2 seconds then slowly return to the floor
- Perform 2 sets to failure