 It is well established that repetitive and sustained flexed postures will damage the spine. Given the preponderance of sitting (trunk flexion) and forward bending (even more trunk flexion) it is critical that we develop the capacity to control these flexed postures.
That is where trunk extension exercises come in. It is the trunk extensor muscles that must hold the spine in a more extended posture and counter balance the gravitational forces that act to pull the spine into flexion.
With respect to strength and stability exercises, there are a few things to point out when prescribing trunk extension exercises to patients.
First, trunk extension exercise to build spine stability needs to focus on an isometric contraction. Remember we are trying to train the lumbar spine to be stable and resist internal an external forces, not to generate power. This is the same concept we have discussed in previous articles discussing the Dead Bug progression and the Standing Trunk Stability progressions.
Second, improving the strength and endurance of the trunk extensors does not necessarily mean the body will use this improved capacity with more functional movements. We can’t just focus on capacity and forget about control. In most cases we will also need to teach our patients how to use this increased capacity properly during sitting as well as functional activities like lifting and squatting.
As a side note, we must also keep in mind that teaching and training a better stoop, deadlift, or squat will be a huge help but is not a substitute for more focused trunk extension exercises to improve endurance. That’s developing control but neglecting capacity. We need to improve muscle endurance so we can combat flexion stress all day.
If the endurance is not there the body cannot execute the proper movement sequence no matter how firmly it is ingrained in your CNS.
In the remainder of this article I will walk you through a really simple trunk extension exercise progression for improving endurance. I will slot in some time over the next week to put together an article discussing how to better tap into this capacity with daily activities like sitting, bending, and lifting.
If you are a subscriber who uses My Rehab Connection for your patient’s home exercise prescription you can find this progression in the exercise groups section.
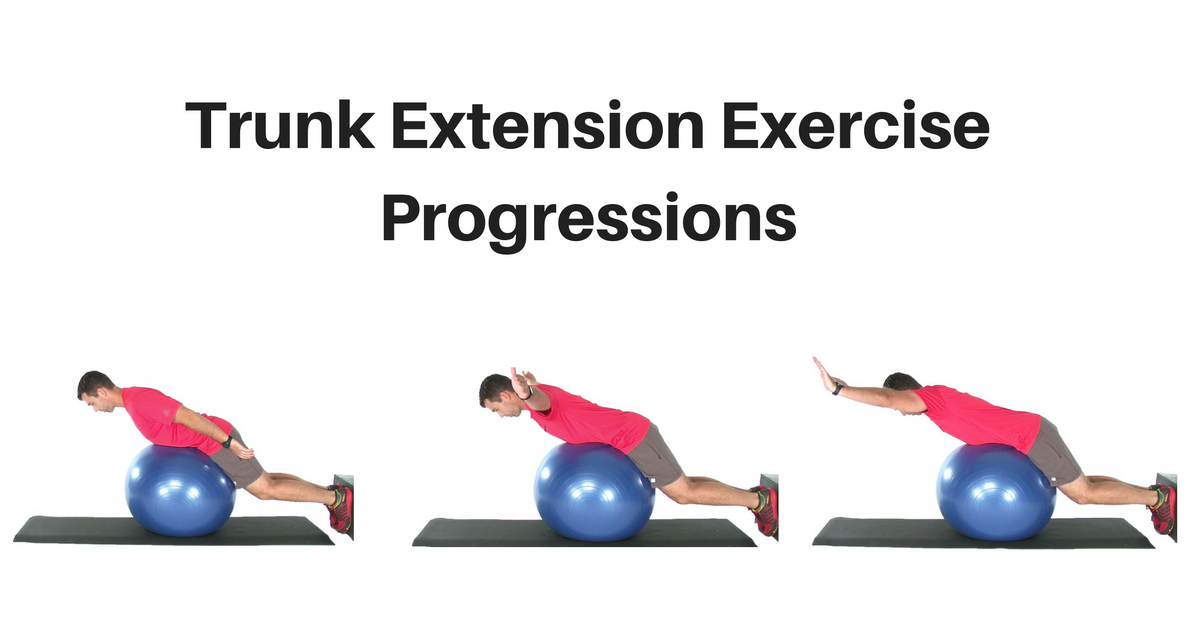
Trunk Extension Exercise Progression
The Trunk Extension Exercise progression begins with the basic exercise to isolate the trunk extensor muscles. Subsequent progressions will make the exercise more challenging by incorporating scapular and shoulder motion. Note how this follows the general pattern of other trunk stability progressions like the Dead Bug.
That’s one of the reasons why I like this progression so much. Once skill in the basic exercise is established the exercise can be progressed without the patient having to learn a completely new pattern. This makes it easier for the clinician and the patient.
While this progression is classically used for lumbar stabilization, you can also use it for thoracic extension as well. To do this you need to have the patient focus on driving the extension from the thoracic spine. We discussed the basics of how to this is a previous article – Thoracic Extension Strength and Control.
Here are the progressions.
Trunk Extension on Ball (Basic)
The Trunk Extension Endurance Progression begins with the basic Trunk Extension on Ball Exercise. The key to this exercise is in the initial set up. Begin with your flat against a wall or door. Then you need to lift your hips up and pull the ball under your hips. If you try to roll onto the ball your feet will be pulled away from the door and you will lose your lower body anchor.
With the ball under your hips the weight of your upper body is initially supported by your arms, which are on the ball or the floor. Then you need to get your trunk (including your head and neck) in a neutral spine position.
Then perform an abdominal brace and lift your arms. It is now the trunk extensor muscles that must work to prevent the trunk from flexing forward over the ball.
The difficulty of this basic exercise can be modified by adjusting the position of the ball. Placement further towards the navel creates a shorter level arm and thus requires less truck extensor effort. Placing the ball lower towards the proximal this requires more extensor activity.
Here are the step-by-step-instructions.
- Begin kneeling in front of an exercise ball with your feet firmly planted on a wall behind you
- Lift your body up with your hands and pull the ball under your hips. Then place your hands on the ball or on the ground in front of you to support the weight of your upper body
- Makes sure your spine is in a neutral position (there should be just a slight arch in your lower back), then perform an abdominal brace and raise your hands off the floor.
- Hold this position for 10 seconds then bring your arms back to the ball or floor and relax your muscles
- Perform up to 10 repetitions 1x/day
Trunk Extension on Ball with Scapular Retraction
The Trunk Extension on Ball with Scapular Retraction exercise begins to incorporate scapular alignment re-training to the Trunk Extensor Endurance Progression. This exercise is performed in the same way as the basic trunk extension on ball exercise, but instead of simply lifting the arms the focus is on pulling the arms back by retracting the scapula.
This will add additional exercise challenge to the trunk extensors as the arms positioned at the shoulders moves the mass of the upper body further away from the ball. Adding active shoulder movement also begins to train the body to move through the shoulders while maintaining a stable trunk.
Here’s how to do it.
- Begin kneeling in front of an exercise ball with your feet firmly planted on a wall behind you
- Lift your hips with your hands and pull the ball under your hips. Then place your hands on the ball or on the ground in front of you to support the weight of your upper body
- Makes sure your spine is in a neutral position (there should be just a slight arch in your lower back)
- Perform an abdominal brace then reach your arms back by pulling your shoulder blades back towards your spine.
- Hold the arms out for 1-2 seconds then bring your arms back towards the floor.
- Perform 3-5 sets of 10 repetitions 1x/day

Trunk Extension with Shoulder Abduction
With the Trunk Extension with Shoulder Abduction, instead of simply pulling the arms and scapulae back you will set the scapulae in retraction then move the arms into abduction and adduction.
This will create more of an endurance challenge to the scapular stabilizers as they must now hold a longer isometric contraction. This will also help build the initial phases of the shoulder abduction pattern, which is often dysfunctional as well.
Here’s how to do it.
- Begin kneeling in front of an exercise ball with your feet firmly planted on a wall behind you
- Lift your hips with your hands and pull the ball under your hips. Then place your hands on the ball or on the ground in front of you to support the weight of your upper body
- Makes sure your spine is in a neutral position (there should be just a slight arch in your lower back)
- Perform an abdominal brace then pull bring your arms to your sides and retract your shoulder blades back and down towards your spine
- Now lift your arms (palms towards the floor) to shoulder height, pause, then lower back to your side
- Perform 3-5 sets of 10 repetitions 1x/day
Trunk Extension on Ball with Overhead Reach
This is the most advanced exercise in the tract. Now instead of abducting the arms to shoulder height they are lifted over head. This creates a lot more demand on the shoulder and scapular muscles. The arms overhead also moves the body weight further from the ball and creates a longer lever to maximally stress the truck extensors.
Here’s how to do it.
- Begin kneeling in front of an exercise ball with your feet firmly planted on a wall behind you
- Lift your hips with your hands and pull the ball under your hips. Then place your hands on the ball or on the ground in front of you to support the weight of your upper body
- Makes sure your spine is in a neutral position (there should be just a slight arch in your lower back)
- Perform an abdominal brace then bend your elbow and pull your arms and shoulder blades back towards your spine
- Keeping your shoulder blades pulled back reach your arms overhead
- Hold the arms overhead for 1-2 seconds then lower your elbows back towards your side. Squeeze your shoulder blades together at the bottom of the motion
- Perform 3-5 sets of 10 repetitions 1x/day.